|
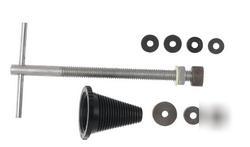
Our Professional Faucet Repair kit gives you everything needed to make seamless repairs to dripping faucets in tubs, sinks and showers. The kit includes four, hardened steel dressers for repairing 1/2â€, 9/16â€, 5/8†and 3/4†faucet seats. The extra-length shaft allows the tool to reach worn seats in deep-style faucets. In addition, the slim-tapered cone can be trimmed to fit most faucet opening sizes. Also included are four replacement washers and a faucet screw. • For making professional repairs to leaking faucets in showers, sinks and tubs. • Hardened-steel dressers repair 1/2â€, 5/16†and 5/8†faucet seats. • Self-aligning cone for even cuts. • Removable T-handle for storage. • Four replacement washers – 2 x 1/2†and 2 x 9/16†• One replacement faucet screw – 8/32†x 3/8†pan head 1. Remove the faucet screw cap (if necessary), faucet handle screw and handle. 3. Remove faucet stem and replace worn washer with a new larger washer supplied in the repair kit. 4. Insert the Reseater Tool into the faucet opening and set the adjustable nut height to just above the opening. 5. Apply liquid or soap to the tool’s plastic washer. 6. Slide the cap nut over the tool and on to faucet. 7. Insert the T-handle into the tool. 8. Without applying excessive pressure, turn the Reseater Tool clockwise three full turns while tightening the cap nut. 9. Remove T-handle, cap nut and remove tool from faucet. 10. Inspect seat for smoothness. Repeat if necessary. 11. Reassemble and check for leaks. 1. Remove the faucet screw cap (if necessary), faucet handle screw and handle. 2. Remove faucet stem and replace worn washer with a new larger washer supplied in the repair kit. 3. Remove plastic washer and adjustable nut from Reseater Tool. 4. Slide guide cone onto tool and insert the Reseater Tool into the faucet opening, centering the cone in the opening. If the cone tapers are too thin, trim them back until the cone engages the faucet opening. 5. Reattach the washer and adjustable nut and set the adjustable nut height to slightly above the opening. 6. Apply liquid or soap to the tool’s plastic washer. 7. Insert the T-handle into the tool. 8. Without applying excessive pressure, turn the Reseater Tool clockwise three full turns while tightening the cap nut. 10. Inspect seat for smoothness. Repeat if necessary. 11. Reassemble and check for leaks. (this posting is the responsibility of the poster) |
Lina.lawson@dfwind.com (Lina Lawson) for more information. All emails will be forwarded to the poster's actual email address.